- less eye strain
- deeper breathing
- a more released muscle-tone
- quieter mental talk -- or no 'words' at all!
- an acceptance of what is
- easier movement
- that critic-Gremlin pipes down
Which of
course, we all want! On the
ground standing still, it's easy to get. Then we
walk. or run. or get on a horse and ride.
or jump! How to keep the head balanced then?
Here's some more tips.
Rotate
rather than Hinge
The trick
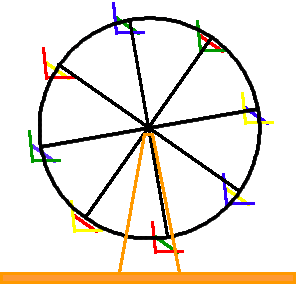
is to allow the head to rotate around it's axis like a wheel
on an axle. Or a Ferris wheel! The center of the
Ferris wheel does not move. The chairs rotate around
the center, just as our nose would rotate around the balance
point of our head. Of course, on a Ferris wheel,
they go all the way around, which we can't do with our
head.
Oscillation around the Norm
One of the ways to find the balance point for the head is to tip the nose up
a little and then down a little. When you do this
slowly, you can monitor whether or not the head is
balanced. Wherever you start, you can determine
if up is better or if down is better, or maybe halfway
between the up is better or halfway between the down is
better. When you go slowly, you can identify where the
new 'better' is. It probably will not be where you
think it will be. When you have a new 'better,'
oscillate again and see if there is an even better place a
smidge higher or a smidge lower.
Usually, the balance point is between the ears. You
can put your fingers in your ears to form the axel which
creates your stationary reference point, then slowly lift
and lower your nose around your ears. When you
are successful at this, the bones in the neck
will not change. This is easiest to see from a side
view:

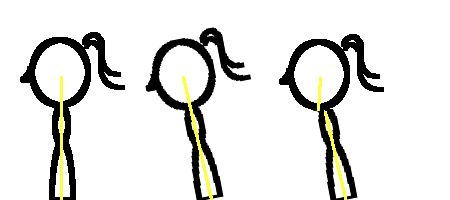
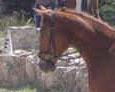
You'll notice that as the nose goes up, the pony tail goes down; as the nose goes down, the pony tail goes up.
Because the head isn't round, it looks a little bit like a
hinge. When you do this, though, you'll be able to
tell if you're hinging or not because the pressure on your
fingers will give you feedback. Alternatively, you
can eventually locate the 'joint' between your skull and
the top of your spine and feel a smooth glide.
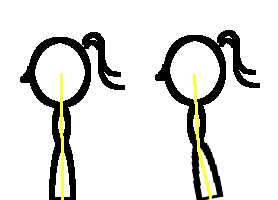
When you start out, what you are looking for is the place
where there is no tension in your neck. For most
people, this looks a lot like the most pony-up, nose-down
position below and the oscillations can not be very big
before tension creeps back in. As much as possible,
you will want to keep tension out of your neck to keep
tension out of your lower back. So in the beginning,
it is preferable to be looking at your belly button with a
released neck, than to be looking up with a tight
neck. Over time, the range of released oscillations
increases as does the relationship between the other curves
in the back, and you will be able to have a released neck
while looking up.
In Jumping
When you are jumping, the trick is to
still feel the smooth glide even though you will be in a
much more extreme position. Instead of your neck being
relatively upright, it may be at a greater slant. You
can still articulate mostly in the joint between the skull
& neck when you get used to it.
Start out upright and
then tilt your torso forward maybe 4 or 5 degrees without changing
the relationship between your neck and body. IE You'll
now be looking at a point closer to the ground than you had
been when you started. Now oscillate a little while at
that amount of 'tilt.'
When you have the
ability to lift your eyes back up to level without incurring
tension in your neck, you can tilt a little further and
repeat the oscillating. Eventually you can get quite a
bit of tilt and maintain a free neck.
| Yep. |
Nope. |
 |
 |
1) start upright
2) tilt slightly keeping plumb line (look at ground)
3) rotate head to look up |
1) start upright
2) bend neck ( or any part of plumb line)
to
keep eyes up as you tilt. |
Have you had a chance to play with this in your
riding? What is your experience with this?


![Centered Riding Today: An Informal Talk by Sally Swift [VHS]](http://ecx.images-amazon.com/images/I/41Vn6PfhzML._SL125_.jpg)
![Centered Riding with Sally Swift [VHS]](http://ecx.images-amazon.com/images/I/51OSh9kd9iL._SL125_.jpg)