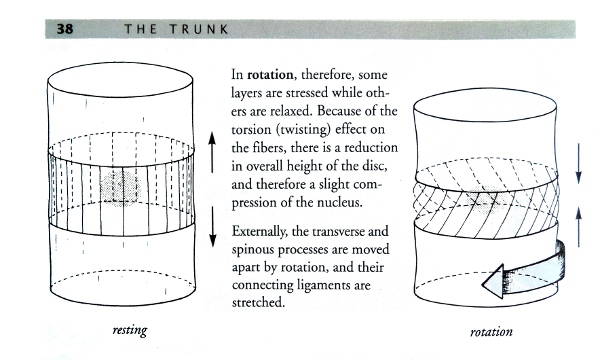
Visual for a 'Twirled' Spine
The image
for Positions
This
week in my Progressions Program the topic is 'Flexibility
Through Changes of Bend.' This topic comes up roughly
every six weeks or so as the topic, but it's not
like you can ride a horse very long before you need to
'bend' it to get around something. As mentioned
in last year's article(!) The key to this comes from
last week's Progression of 'Straightness through Bend' and
pivots upon understanding what bend actually is in a horse
-- and in a person, too.
Bend is
actually a twirl or twist throughout the length of the
spine.
If you've ever rung the water out of a washcloth or
towel, you've experienced the same principle. If you
wring the towel from the ends, it will start to bend.
This is the same principle with the horse's
spine. Because the horse's spine is longer, it
looks like a bend. Since our spine is shorter, we do
not bend; only the twist is evident. But it is the
same twist in the horse's spine that results in a 'bend.'
The twirl or twist translates into the inside of the
horse's spine lifting and the outside of the horse's spine
dropping when it goes into position. For us, because
we have a shorter spine, there is no noticeable bending;
however, if we were to get down on all fours and 'twirl,'
it would become apparent that the inside shoulder and
ribcage lift, just as in the horse's body.


The Visual
Since we are vertical, it helps to have a vertical
image to work with. For this image, imagine
this is your spine seen from behind you.
In this image, each 'hockey puck' represents the
location of a vertebra on the plumb line or in the 'column'
surrounding the plumb line. This is different
from the spinal column. The spinal column weaves
from front to back through the plumb line.
The shading
indicates these imaginary sections are round while the little black hash marks
represent the spinous processes of the vertebra in back.
The wings of the spine aren't shown, but when the spine is
in a neutral position, they would be on the left and right
sides of the column.
Each hockey puck is 'on' the plumb line, neither to
the left nor the right, neither ahead of or behind the
plumb line. Each hockey puck is level to the ground
and to the vertebra above and below it.
It's as if your spine were 'in front' of you or you
were behind your spine.

When you are in position
left,
(a) all the hockey pucks have to
stay on the plumb line, in their column. No jumping
left or right. No jumping to the front or back or a diagonal
or anywhere else. They stay on the plumb line.
(b) all the hockey pucks stay level. there's no 'airplane-ing'
anywhere. There's no tipping up or down on the sides
or in the front or anywhere else. (in truth they do
not stay level to the ground but in terms of communicating
with your body, you will get the best results by maintaining
a level relationship to the ground, which is the same as a perpendicular
relationship to the plumb line.)
(b) each hockey puck would twirl the same amount
relative to all other hockey pucks just a little bit to the
left, twirling the spinous process to the right. This is indicated
by the hash marks being evenly spaced throughout the length
of the diagram.
(c) when the twist is even throughout the spine, the
inside shoulder comes back, the inside hip goes forward,
the outside shoulder comes forward, the outside hip goes
back. The inside hip comes up just a bit due to
the connection of the hips to the spine, but that is
accomplished with a different visual. Your best
positioning will come by keeping all the hockey pucks level
to the ground.
(for those of you thinking, isn't this the same if this
were the front of the body? yes, it is! only
there's no spinous process in front of the spine to
reference, but you can use the visual from the front, too.)
This is just to get you used to the idea, to
understand what the visual is and what we want to achieve
with the visual. My recommendation for learning how
to do this is with the Lazy Susan
exercise.
If you try it, let me know how it goes! And if
you'd like some hands on, call me up for a
lesson.
Cheers!
L
ps I'll just add, in Centered Riding, the
main concept is that whatever I'm doing with my own body,
I'm modeling for the horse to do in theirs. So you'll
notice I didn't say anything about which reins to use or
where to put my legs or anything. I do this all on a
loose rein. (unless the horse tries to exit stage left and
then I keep contact!)
|


![Centered Riding Today: An Informal Talk by Sally Swift [VHS]](http://ecx.images-amazon.com/images/I/41Vn6PfhzML._SL125_.jpg)
![Centered Riding with Sally Swift [VHS]](http://ecx.images-amazon.com/images/I/51OSh9kd9iL._SL125_.jpg)