Self Carriage
Balances, Teeter-totters,
and Steampunk Engines
This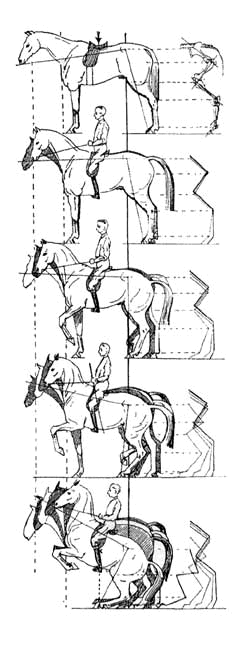 week in my Progressions Program the topic is
'Transitions.' Part of the idea is to create a nimble
horse, part of it is to strengthen the haunches and protect
the back, part of it is to get that lovely self-carriage!
week in my Progressions Program the topic is
'Transitions.' Part of the idea is to create a nimble
horse, part of it is to strengthen the haunches and protect
the back, part of it is to get that lovely self-carriage!
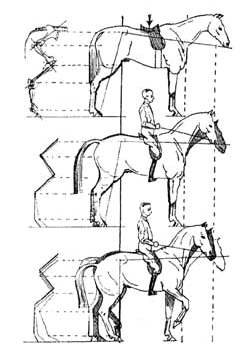
For the self-carriage part, I have been using the old standby photo
from Muesler's Riding
Logic and another image I seem to have made up -- but I
would've sworn I've seen it somewhere! and one I have
for sure made up, but is probably out there also.
What we want
The goal here is to have a horse that is engaged and
'light on the forehand' with the feeling that it is
sitting.
As the hind end sits, the front-end lifts.
And as always, I would prefer the horse do this, not
me.
Image 1
So while the pic from Muesler shows what we want, the
trick is to get the horse to do it.... which I'm sure I've
seen! But now can't find. It is the image of a
balance:

To use the image, I just start putting heavy things
on the side of the backend. I count for 4 steps to
lift and then leave the horse alone for 4 steps, then
repeat. The idea is to move in and out of what I want
so that the horse experiences there is something different
-- which is when the horse is learning/discerning and also
when the musculature is getting challenged to change.
Static a lot of times turns into asleep. In this pic, the
back end is on the left.
|
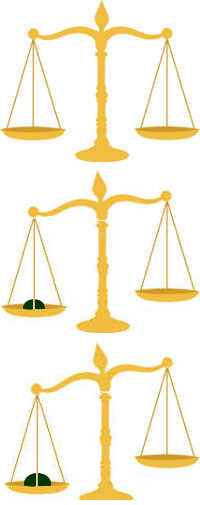 |
You'll notice how as the 'back end' goes down,
the distance between the two trays decreases.
This corresponds to the length of the horse.
The image does not get into how the horse does
this. It simply says to the horse, "Drop
your butt." But by the nature of the image,
this implies the front end will be lifted up.
The one doesn't happen without the other. They
are connected and moving one inherently moves the
other.
One could also just use the images from Muesler
in the fashion of a film reel; however, I think the
connection from front to back isn't as solidly held in
the image and this is how folks get into trouble with
some of the stuff they do. With the balance,
it's that T arm is pretty solid and one intuitively
knows it's not hinged in the middle the way a real
horses back can be. |
Images 2 & 3 (Which, you'll have to
imagine!)
If you take away the trays, you can think of this as
a simple teeter totter, where you're just piling weight
onto one side of the teeter totter and that is lifting the
other end.
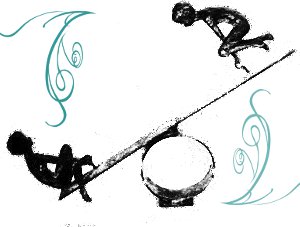
As I was playing with this image, I got to thinking
of bellows and got to wondering, what if there were a
bellows on the end being weighted? And that bellows
was then connected to the other side of the balance and was
pushing up the end being lifted? Add in the sound
track from Elementary or one of the recent Sherlock Holmes
movies and now you've really got some life in the
image! (Sorry - can't find images on this.)
Some footnotes
How does this work? for
instance.
It relies on entrainment and resonance, which
transcends 'verbal' or even 'physically initiated'
cues. Recently scientists have been investigating
'mirror neurons' and this is probably the mechanism.
In practical terms, athletes recognize this as being 'in
the Zone' where they experience 'Flow.'
I came to know this on a regular basis through the
principles taught by Sally Swift and which I now teach to
clients. Using imagery and awareness it's a lot
easier to achieve the goals of traditional or classical
dressage, to jump fences, to take long trail rides, to be
on a horse, to be near a horse, to (well, you get it!)
The imagery (or sensation or noise) conveys more information
than what we can verbalize because it is encoded by
the 'right brain' which is holistic in nature. This
is why we want to pick our images well. For instance,
a slinky toy is not the image to use here, because one of
the main 'messages' in a slinky toy is how the shape
changes. For this image we want something (like the
teeter totter board) which does not change shape although
it changes it place in space.
Why not lift the front end?
For teaching lightness on the forehand, I have met more than a few trainers who
physically lift the
front end of the horse by lifting the hands up with the idea that the back end will sit.
They have told me I just have to go around like this for
awhile, like a month. I
have even bought into this and tried it. (Although
I did bail a lot sooner than the recommended month!)
What I've noticed is:
- the horse is bigger than me, even if I've got some
kind of leverage going on
- the horse is way more stubborn than I am, or
argumentative, or annoyed, or ... the list goes on
- it ruins my position and I'm unbalanced - hence,
I'm not modeling what I want the horse to do
- my arms hurt like hell
- my back is out of whack
- the horse doesn't know what I'm doing or why, not
really, so
- it doesn't last over time
- which is probably good because the horse usually
goes inverted rather than lifting because
- the front end has come up but there's nothing,
really, in the horse's mind that says the back end
should be going down.
I am,
because of experience, not a fan of this teaching the horse
to go with better self-carriage.
In the moment, if your horse has gotten it's head in
an odd spot, of course, it's ok to follow with your hands
and it's even ok to briefly not follow with your hands - if
it conveys the message you wish to convey.
If you try it, let me know how it goes! And if
you'd like some hands on, call me up for a
lesson.
Cheers!
L
ps I'll just add, in Centered Riding, the
main concept is that whatever I'm doing with my own body,
I'm modeling for the horse to do in theirs. So you'll
notice I didn't say anything about which reins to use or
where to put my legs or anything. I do this all on a
loose rein. (unless the horse tries to exit stage left and
then I keep contact!)
|


![Centered Riding Today: An Informal Talk by Sally Swift [VHS]](http://ecx.images-amazon.com/images/I/41Vn6PfhzML._SL125_.jpg)
![Centered Riding with Sally Swift [VHS]](http://ecx.images-amazon.com/images/I/51OSh9kd9iL._SL125_.jpg)